If you are currently staring at pfSense with fourteen browser tabs open, trying to figure out why your WireGuard tunnel shows a handshake but not a single byte of internet traffic will pass through—take a breath. You are not stupid, and you did not misread the public keys.
You just hit the exact same wall almost everyone hits when they try to set up WireGuard on pfSense.
Every tutorial on YouTube makes it look like a five-minute breeze: install the package, paste some keys, add a peer, and boom, you are done. But in reality, you click "Save," you toggle the handshake, your handshake timer lights up... and your local network immediately loses connection, DNS stops resolving, or your traffic leaks right out through your ISP anyway.
Here is the straightforward, no-BS guide on how to configure WireGuard on a pfSense firewall correctly, the massive routing trap that breaks 90% of setups, and an honest look at whether running a VPN at the firewall level is actually what you need.
Article summary and product fit
Why can a pfSense WireGuard tunnel show a healthy handshake while LAN traffic still has no internet access?
The article explains that the WireGuard tunnel is only one layer of a working pfSense outbound setup. Interface assignment, a usable gateway, outbound NAT, firewall rules, and policy routing all have to line up before LAN traffic will actually leave through the tunnel.
Key points and limits
- Best for: pfSense users building an outbound privacy gateway who have a working WireGuard handshake but broken routing or DNS.
- Key point: The article identifies the common gateway and Hybrid Outbound NAT steps that are easy to miss after the tunnel itself is configured.
- Product fit: OnlyDogs VPN is presented as an endpoint alternative for people who prefer per-device presets, automatic routing, network handoff recovery, and less firewall maintenance.
- Important limit: A router-level tunnel can still create single-point failures, streaming blocks, and complex per-device routing requirements; an endpoint app is not a replacement for every site-to-site or homelab use case.
Sources referenced in this article: IPLeak.net, OnlyDogs VPN official website.
What Most Tutorials Don't Tell You: WireGuard on pfSense Isn't Just a Tunnel
When you install a VPN app on your phone or laptop, it handles routing, DNS redirection, kill switches, and interface bindings silently in the background.
pfSense does none of that for you.
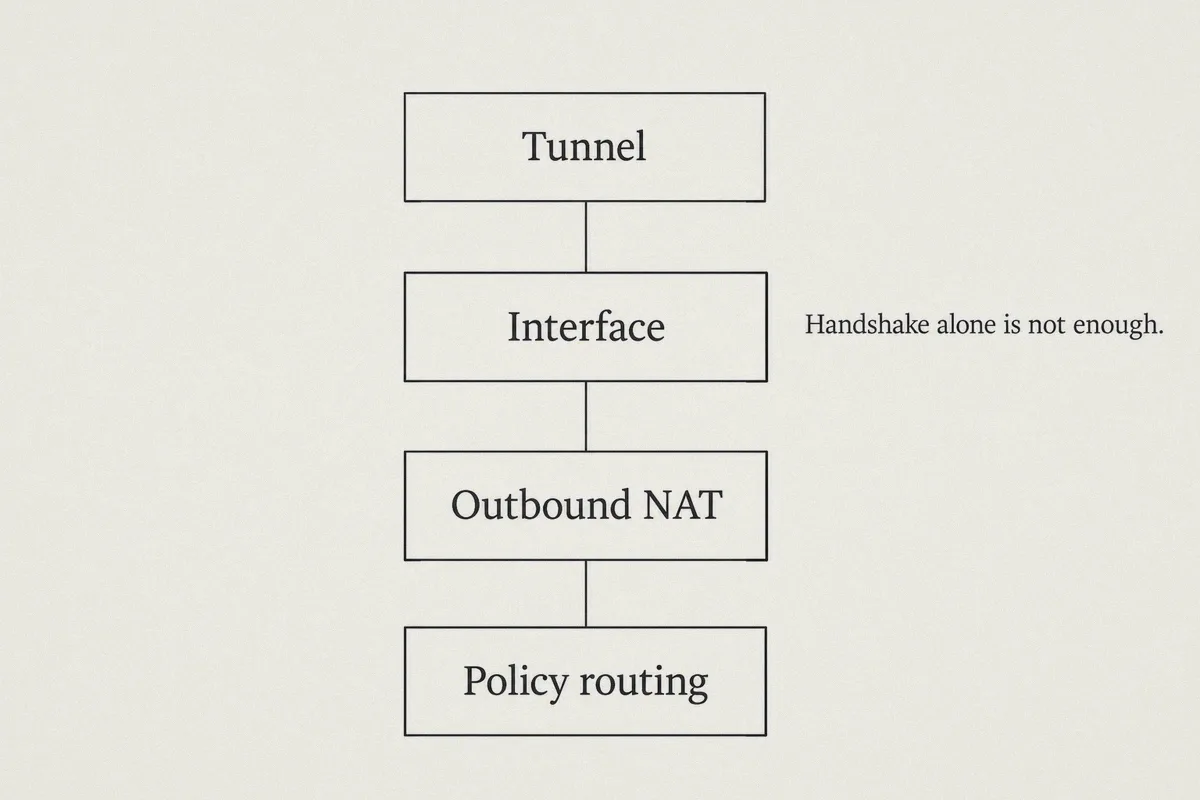
On pfSense, WireGuard is treated strictly as a virtual network interface. Setting up the tunnel is only about 30% of the job. The real reason setups fail is that pfSense requires you to manually wire together four distinct layers:
- The Tunnel & Cryptography (Public/Private keys, Listen Ports, and Peers).
- Interface Assignment (Turning the WireGuard tunnel into an addressable pfSense interface).
- Outbound NAT Rules (Translating your LAN traffic so the remote VPN gateway actually accepts your packets).
- Firewall Rules & Policy Routing (Forcing your devices to use the WireGuard gateway instead of the default WAN).
If you miss even one checkbox in Outbound NAT, your handshake will look completely healthy, but you won't be able to load a single webpage.
Step-by-Step: The Clean Setup That Actually Works
Before touching anything, decide which scenario you are building:
- Scenario A (Remote Access): You are outside your house and want to dial into your home lab/LAN.
- Scenario B (Privacy / Outbound Gateway): You want your entire home network (or specific devices) to route all outbound internet traffic through an external VPN provider.
Most people searching this guide are trying to build Scenario B (routing outbound traffic). Here is the clean procedure for that setup.
Step 1: Install the Package & Generate Keys
- In pfSense, navigate to System > Package Manager > Available Packages.
- Search for
WireGuardand click Install. (On modern pfSense Plus / CE 2.7+, WireGuard is well-maintained as an official package). - Go to VPN > WireGuard > Tunnels and click Add Tunnel.
- Set Description to something clear (e.g.,
WG_OUTBOUND). - Click Generate next to Private Key. Copy the generated Public Key—you will need this if you are connecting to an upstream provider.
- Set the Listen Port (leave blank for random, or standard
51820). - Enter the Interface Address provided by your VPN service (usually something like
10.x.x.x/32). Click Save.
Step 2: Add Your Peer (The Remote Server)
- Switch to the Peers tab and click Add Peer.
- Select your newly created tunnel.
- Paste the Endpoint IP/Domain and Port of your upstream VPN server.
- Set Keep Alive to
25(this prevents firewalls and NAT states from dropping the connection during idle periods). - Paste the upstream server's Public Key.
- Allowed IPs: For an outbound privacy gateway, set this to
0.0.0.0/0(all traffic). Click Save, then hit Apply Changes.
Step 3: The Crucial Step Most People Miss — Assign the Interface
If you don't assign the tunnel to an interface, you cannot create firewall rules or NAT policies for it.
- Go to Interfaces > Assignments.
- Under "Available network ports", look for
tun_wg0(or your new WG instance) and click Add. - Click on the new interface name (e.g.,
OPT1), check Enable Interface, rename it toWG_VPN, and leave IPv4/IPv6 Configuration Type as None (WireGuard handles IP addressing at the tunnel level). Click Save and Apply.
Step 4: Create the Gateway & Fix Outbound NAT
This is where 9 out of 10 people get stuck in a "no-internet" loop.
- System > Routing > Gateways: Create a gateway on your
WG_VPNinterface using the gateway IP provided by your tunnel config. - Go to Firewall > NAT > Outbound.
- If it is set to Automatic, switch it to Hybrid Outbound NAT rule generation and click Save.
- Add a new rule at the top:
- Interface:
WG_VPN - Source: Your local network (e.g.,
192.168.1.0/24or an alias of specific device IPs you want routed). - Translation Address:
Interface Address.
- Click Save and Apply Changes.
Step 5: Policy Route Your Traffic
- Go to Firewall > Rules > LAN.
- Find the rule that allows LAN traffic out to the internet (or create a dedicated rule above it for specific IP addresses).
- Edit the rule, scroll down to Advanced Options, and find Gateway.
- Change it from Default to your WG_VPN_GW.
- Save and apply.
Now, any packet matching that rule will be pushed straight into the WireGuard tunnel and translated properly by NAT.
The Reality Check: Is a Router-Level VPN Actually What You Want?
Once you finish this setup and test your IP on ipleak.net, it feels like magic. Everything on your selected VLAN or LAN is automatically masked behind an encrypted tunnel.
Then real life happens.
A few days in, the hidden trade-offs of running a raw VPN tunnel on pfSense start showing up:
- The Streaming Blockade: The second you sit down to watch Netflix, Disney+, or Amazon Prime on your Apple TV, the stream throws a proxy error. Standard VPN servers and commercial WireGuard endpoints are constantly flagged and blacklisted by streaming platforms.
- The "Everything Breaks" Friction: When an upstream WireGuard server experiences maintenance or routing congestion, your home network goes dark. If you didn't configure a complex failover rule with DNS fallback, your smart home devices, IoT cameras, and work laptops suddenly drop offline.
- The Granularity Nightmare: You rarely want everything on your home network routed through the same tunnel. You want your torrent client encrypted, your streaming box using a clean media route, your work laptop bypassing the VPN entirely, and your phone protected on sketchy Wi-Fi when you leave the house. Building that logic in pfSense requires aliases, multi-WAN gateway groups, kill switches, and DNS resolver overrides.
If you love tinkering with FreeBSD routing tables on a Saturday afternoon, pfSense is unbeatable. But if your actual goal is simply "I want my devices protected, fast, and able to bypass regional locks without having to manage a network engineering project," running WireGuard directly on your perimeter firewall is often the hardest way to get there.
A Simpler Alternative: Why Endpoint Management Usually Wins
For most people, the frustration isn't with VPNs—it's with the friction of configuration.
When you need privacy, anti-censorship, and streaming that works across your Mac, Windows PC, iPhone, and Android without breaking your home internet, managing it at the device level with a purpose-built client is vastly more practical.
This is where a modern client like OnlyDogs VPN flips the experience completely:
1. Zero Config & Scenario Presets
Instead of spending two hours configuring Outbound NAT rules, Gateway Groups, and AllowedIPs, OnlyDogs uses Scenario Presets. Want to stream 4K content without triggering proxy detection? Click the Streaming Preset. Want low latency for browsing or downloads? Click Fastest Line. It automatically selects the optimal path without you having to understand interface routing.
2. Built for Restricted Networks (Beyond Public WireGuard)
Standard WireGuard has one major drawback in 2026: its protocol handshake is completely unmasked. Major firewalls, ISPs, and restrictive regions (like China, the UAE, or enterprise networks) can identify and throttle WireGuard traffic in seconds. OnlyDogs employs a proprietary protocol architecture leveraging HTTP/3 and deep traffic obfuscation, blending into normal encrypted web traffic so your connection stays stable where raw WireGuard gets blocked.
3. Native Ad & Tracker Blocking (Without Pi-hole Maintenance)
Many users build pfSense tunnels just to route traffic through pfBlockerNG or Pi-hole. OnlyDogs builds this directly into the connection using combined DNS and node-level filtering—stopping invasive web trackers and disruptive video ads right out of the box, complete with a transparent block counter.
4. Seamless Network Switching
If you use a pfSense VPN setup, it only protects you while you are sitting in your living room. The moment you step outside and connect to public coffee shop Wi-Fi or cellular data, you are exposed again. OnlyDogs runs consistently across macOS, Windows, iOS, and Android, handling the handoff between Wi-Fi and mobile networks with instant recovery so you never drop your connection.
5. No Passwords to Manage
Forget storing complex pre-shared keys, private keys, or passwords. OnlyDogs uses secure, one-time email verification codes for login, making multi-device deployment effortless.
👉 Try OnlyDogs VPN if you want fast, zero-configuration privacy across all your devices without the headache of debugging firewall rules.
Final Recommendation: Which Path Should You Choose?
- Stick with the pfSense WireGuard setup if: You are managing a dedicated site-to-site office tunnel, running a strict home lab that needs always-on isolation for local servers, or you specifically enjoy fine-tuning granular firewall policies on your own hardware. (Just make sure you double-check your Hybrid Outbound NAT rules from Step 4!).
- Switch to a dedicated client like OnlyDogs if: You just want seamless streaming, rock-solid censorship circumvention, and fast, encrypted browsing on your personal devices—without breaking your family's smart TV or spending your evening troubleshooting routing tables.
A firewall should protect your network perimeter; it shouldn't make everyday browsing feel like a chore. Choose the tool that solves your actual problem, not the one that creates new ones.
Frequently Asked Questions
Why can WireGuard show a handshake on pfSense but still pass no internet traffic?
Because the handshake only confirms the tunnel peers can communicate. The article says the assigned interface, gateway, outbound NAT, firewall rules, and policy routing must also be configured correctly.
Why does the article switch pfSense Outbound NAT to Hybrid mode?
Hybrid mode lets the existing automatic rules remain while adding an explicit NAT rule for LAN traffic leaving through the WireGuard interface.
What is the difference between the two WireGuard scenarios in the article?
Remote Access brings an outside device into the home LAN, while the outbound gateway scenario sends selected local devices or networks out through an external VPN provider.
When does the article recommend keeping pfSense instead of using an endpoint VPN client?
It favors pfSense for site-to-site links, homelabs, and granular always-on firewall policies. It presents an endpoint client as simpler when the goal is ordinary per-device privacy, streaming, or travel use.