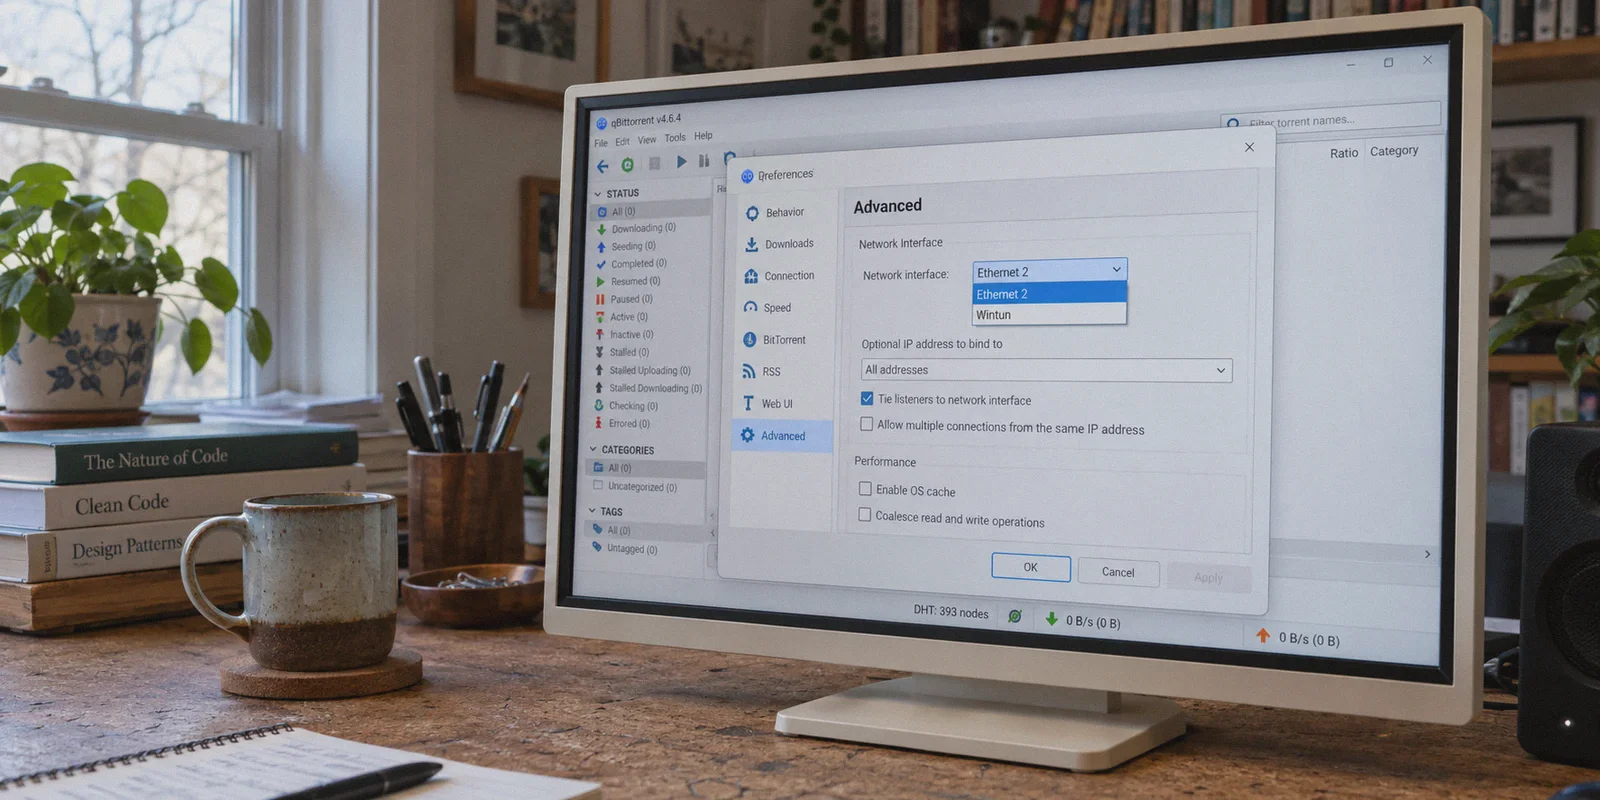
If you landed on this guide, you’re probably staring at qBittorrent’s advanced settings menu with a slight spike in blood pressure. You clicked into the dropdown for "Network Interface," expecting a straightforward button that says "VPN," only to find an unhelpful laundry list of cryptic names: Ethernet 2, wlan0, Local Area Connection* 12, utun3, or random alphanumeric strings.
Pick the wrong one, and your real IP is broadcasting straight into the public torrent swarm. Pick the right one, and you build the single most reliable fail-safe in modern torrenting.
Here is the straightforward walkthrough on how to bind qBittorrent to your VPN interface in under two minutes—followed by the critical leak traps that standard tutorials never tell you about.
Article summary and product fit
What this article answers
Bind qBittorrent to the VPN's specific virtual network interface, restart the client, and force a disconnect test. If the binding is correct, torrent traffic should fall to 0 B/s when the VPN drops instead of falling back to the normal Wi-Fi or Ethernet adapter.
Key points
- Best for: People who want qBittorrent to stop automatically if the VPN interface disappears.
- Core setup: Identify the active VPN adapter, select it under qBittorrent → Advanced → Network Interface, then restart qBittorrent.
- Verification: Run a legal active torrent, disconnect the VPN, and confirm peers and transfer speed immediately stop.
- Watch for: VPN updates or protocol changes can rename virtual adapters, so the binding should be rechecked after changes.
Where OnlyDogs VPN fits
The article positions OnlyDogs VPN as a complementary network layer for users who also care about obfuscation and recovery when Wi-Fi or upstream routing becomes unstable. It does not replace the qBittorrent interface binding itself.
Important limits
Binding protects against fallback to the wrong local interface only when the correct adapter remains selected. It does not remove the need to retest after VPN or operating-system changes, and it does not solve every ISP throttling or network-quality problem.
Sources already linked in this article: OnlyDogs VPN official site.
Why "Kill Switches" Aren't Enough (And What Binding Actually Does)
Most commercial VPNs come with a built-in "Kill Switch." The marketing makes it sound bulletproof: if the VPN drops, the kill switch cuts your internet so your real IP doesn't leak.
In reality, a software kill switch works like a security guard standing next to an open door:
- The VPN tunnel collapses.
- The software detects the collapse (which takes anywhere from 500 milliseconds to several seconds).
- The app orders your operating system’s firewall to slam the door shut.
That tiny gap—the fraction of a second between detection and execution—is when leaks happen. Torrent clients send hundreds of simultaneous peer requests every second. If the tunnel drops for even two seconds while you step away for coffee, your torrent client instantly defaults back to your standard home Wi-Fi adapter. Your true home IP is stamped into the torrent swarm's public peer list, where copyright trolls and automated trackers harvest it instantly.
Interface Binding is different.
Instead of waiting for an app to react, you tell qBittorrent: "You are physically forbidden from sending or receiving packets through any door except this specific virtual VPN cable."
If the VPN connection drops, qBittorrent doesn't "try to block" your traffic—it simply has nowhere to go. Traffic halts instantly to zero bytes. No delay, no reliance on software reaction time, and zero leaks.
Step-by-Step: How to Bind qBittorrent to Your VPN
Before touching qBittorrent, you need to know the exact internal name your operating system assigned to your VPN's virtual adapter.
Step 1: Identify Your VPN Interface Name
On Windows:
- Connect to your VPN.
- Press
Win + R, typencpa.cpl, and hit Enter. This opens the Network Connections control panel. - Look at your active adapters. You will see your regular connection (e.g., Wi-Fi or Ethernet), alongside a virtual adapter created by your VPN.
- Virtual adapters typically include the name of the VPN or generic virtual drivers such as
TAP-Windows Adapter,Wintun Userspace Tunnel, or the VPN brand's custom virtual network device. - Note down the exact display name shown at the top of that icon (for example:
Ethernet 2orLocal Area Connection* 3).
On macOS:
- Connect to your VPN.
- Open Terminal and run: Bash
ifconfig | grep -E "^[a-z0-9]+:"
- Look for virtual tunnel interfaces, almost always named
utunfollowed by a number (such asutun2,utun3, orutun4). Disconnecting and reconnecting will confirm whichutunadapter appears and disappears.
Step 2: Lock qBittorrent to That Interface
- Open qBittorrent.
- Click Tools > Options (or press
Ctrl + P/Cmd + ,on Mac). - In the left-hand sidebar, click on Advanced.
- Right near the top, look for the row labeled Network Interface.
- Click the dropdown menu (which by default is set to
Any Interface). - Select the exact VPN interface you identified in Step 1.
- Immediately below it, find Optional IP address to bind to:
- Set this to your VPN’s local tunnel IP, or leave it set to
All IPv4 addressesif you want qBittorrent to adapt automatically whenever your VPN server assigns a fresh internal IP.
- Click Apply, then click OK.
- Restart qBittorrent completely (right-click the tray icon and select Exit, then relaunch it).
Step 3: Run the 10-Second Failure Test
Never assume a security setting works without forcing it to fail.
- Start downloading an active, legal torrent with plenty of seeds (such as an official Ubuntu ISO).
- Confirm speeds are climbing normally.
- While the download is active, hit Disconnect on your VPN client.
- Watch the qBittorrent speed gauge:
- If it worked: The download speed should immediately plunge to
0 B/s, and all seeds/peers will disconnect. It should stay at zero even though your regular home internet is working fine for browsing. - If it failed: If downloads continue over your raw home connection, you picked the wrong adapter in the dropdown. Go back to Step 1.

The Catch: Why Interface Binding Still Fails Most Users
Binding your interface is an essential step, but treating it as a silver bullet leaves several major vulnerabilities wide open. In the real world, three recurring issues cause torrent leaks even when users think they are safely bound:
1. Adapter Renaming Drift
Operating systems—particularly Windows 10 and 11—frequently rename or shuffle virtual adapters. When your VPN client pushes an automatic background update or switches protocols (e.g., from OpenVPN to WireGuard), it may uninstall the old virtual adapter and spin up a new one named Ethernet 3 instead of Ethernet 2.
qBittorrent won't warn you about this. If its bound interface vanishes, certain builds will silently stall, while others fail open upon software reinstall. If you don't inspect your settings after every client update, you could be running unsecured without realizing it.
2. Deep Packet Inspection (DPI) & ISP Throttling
Binding hides your IP inside the swarm, but it does not hide the fact that you are running heavy P2P traffic from your Internet Service Provider (ISP).
Standard VPN protocols like generic OpenVPN and WireGuard produce distinct cryptographic packet handshakes. Network providers in regulated regions, dorms, shared apartments, or restrictive networks don't need to know what you are downloading—they see repetitive P2P block transfers wrapped in standard VPN signatures. The result? Aggressive bandwidth shaping, artificial packet drops, or outright protocol blockage that grinds your torrents to a halt.
3. Connection Fragility & Network Shifts
Traditional VPN connections are notoriously brittle when your physical network environment fluctuates. If your laptop moves between home Wi-Fi and a mobile hotspot, or if your local router experiences a momentary micro-drop, conventional VPN tunnels hang. They get trapped in reconnect loops, leaving your torrent client frozen in an inactive state for hours while you wait for downloads that never finish.
A Cleaner Solution: Eliminating the Configuration Headache
If you enjoy auditing network adapter names in Windows system folders every couple of weeks, manual binding works fine. But for anyone who just wants bulletproof privacy without acting as an unpaid network administrator, the underlying issue is that most legacy VPNs were never engineered for modern, hostile network conditions.
This is where OnlyDogs VPN approaches the problem from a fundamentally different angle.
Instead of relying on fragile, generic open-source protocols that leave obvious signatures for your ISP to throttle, OnlyDogs VPN operates on an optimized HTTP/3 proprietary transport with advanced traffic obfuscation.
Here is what that difference actually means in day-to-day use:
- Invisibility to Network Filters: Because your traffic mimics standard modern web traffic (HTTP/3) rather than an obvious P2P-loaded VPN tunnel, ISPs and strict network firewalls cannot easily single out your connection for throttling or inspection.
- Instant Reconnection on Network Drops: When your connection jitters or switches between Wi-Fi and mobile data, OnlyDogs VPN recovers the tunnel instantly without leaving your system hanging or dropping packets into the clear.
- Zero Technical Jargon: You don't have to decipher whether your tunnel is running on
utun3or a virtual TAP driver. OnlyDogs VPN simplifies usage with direct Scenario Presets (High-Speed, Streaming, Anti-Tracking) that automatically configure optimal routing behind the scenes. - Frictionless Multi-Platform Support: Whether you manage downloads on macOS, Windows, Android, or iOS, the setup remains uniform, requiring no complex password vaults—just clean, secure email verification login.
If you are tired of wondering whether your virtual adapter settings survived your latest system restart, pairing your client with an obfuscated, resilient connection gives you actual peace of mind.
👉 Check out OnlyDogs VPN and protect your downloads without the setup hassle
Final Verification Checklist
Before leaving any torrent running unattended, run through this quick checklist:
- Verify Torrent IP Separately: Visit a torrent IP detection tool (like ipleak.net), add their detection magnet link to qBittorrent, and check the IP reported in the web dashboard. It must match your VPN server's IP, never your ISP's assigned IP.
- Disable UPnP / NAT-PMP in qBittorrent: Under Options > Connection, uncheck "Use UPnP / NAT-PMP port forwarding from my router" unless you are explicitly using dedicated port forwarding through your provider. This prevents your local router from accidentally mapping external ports directly to your machine.
- Keep the Bind Verified: Whenever your VPN app releases a major version update, spend 10 seconds in
ncpa.cplto confirm your virtual adapter didn't get quietly renumbered.
Frequently Asked Questions
Why bind qBittorrent to a VPN interface instead of relying only on a kill switch?
The article explains that a software kill switch reacts after a tunnel failure, while interface binding restricts qBittorrent to one specific virtual adapter. If that adapter disappears, qBittorrent has no permitted path for torrent traffic.
How do I identify the VPN interface that qBittorrent should use?
On Windows, compare the active adapters in Network Connections and note the virtual adapter created by the VPN. On macOS, the article suggests checking which utun interface appears when the VPN connects and disappears when it disconnects.
How can I test whether the qBittorrent binding actually works?
Start a legal torrent with active peers, confirm it is transferring, then disconnect the VPN. A correct binding should make the transfer drop to 0 B/s and disconnect peers while ordinary web access on the computer can still remain available.
Why can a working binding fail later?
VPN client updates, protocol changes, or operating-system changes can replace or rename the virtual adapter. The article recommends rechecking the selected interface after those changes instead of assuming the old binding is still valid.